 Addness
Home
How to use Home, which focuses on today.
Last updated: 2026-11-03
What this page is for
Section titled “What this page is for”Home is where you choose and work through your ToDos. Open “See all ToDos” to view your goal tree in a dialog. Adding and decomposing goals, adding them to your ToDos, asking AI, and completing can all be done on this screen too.
Open it from “Home” in the sidebar.
How ToDos work
Section titled “How ToDos work”There are two lists: “ToDos” on Home and “All ToDos” in a modal.
- ToDos: Goals you chose to work on now. They stay until you complete them or remove them yourself
- All ToDos: A modal opened with “See all ToDos”. It displays your goal tree; add goals to “ToDos” with the ”+” at the start of a row
Home
ToDos
Goals you chose to work on now
All ToDos
Your goal tree. Open it with "See all ToDos"
Even if it's due today, it isn't added to ToDos automatically
What happens to ToDos you add?
Each day starts at 4 a.m. in your organization's time zone
Add
ToDos added with the + at the start of a row stay when the date changes
Complete
Completed ToDos remain visible for the rest of the day
They stop appearing in the list the next day
Remove
Let's use − to remove ToDos you won't work on now
Removed goals remain in “All ToDos”
Items stay in ToDos until completed or removed
Three things people often ask about:
- ToDos stay when the date changes. Items in ToDos remain until you complete them or remove them with “−”. You don’t need to choose them again every morning
- Completed ToDos stop appearing the next day. They remain visible on the day of completion, then disappear from the list at 4 a.m. the next day in your organization’s time zone
- A goal due today isn’t added automatically. The due date only shows as a badge at the right end of the row. If you’ll do it now, add it with ”+”
Goals added by a template routine go into the assignee’s ToDos automatically on the scheduled day. Unfinished ToDos from the previous run also stay until completed or removed. (→ For recurring work, use routines).
Screen layout
Section titled “Screen layout”It consists of two parts: “ToDos” on Home and “All ToDos” in a dialog.
① ToDos
Section titled “① ToDos”A list of the to-dos to work on now. The line under the heading is a progress bar (completed ○/○), so you can tell progress at a glance. To the right of the heading are the following buttons.
- ”?”: Opens Home’s concept tour
- “Addness the ToDo to work on now”: Organizes your goal tree and has AI decide which ToDos to work on now (on phones, only the icon appears)
- “Everyone’s goals” (desktop): Opens the goal tree of the whole organization. In an organization where you are the only member, the name is “Goal tree”
- “Hide completed”: Collapses completed to-dos. Bring them back with “Show ○ completed”
- ”…”: Lets you remove everything from ToDos, use Google Calendar integration, and set routines
The following kinds of to-dos are mixed here:
- To-dos you added yourself: To-dos registered with the ”+” in the goal tree and so on
- Routine to-dos: To-dos auto-added on a set rhythm from a template routine
Press “See all ToDos” at the very bottom of the upper “ToDos” list to open the “All of ◯◯‘s ToDos” dialog (◯◯ is your name).
When to-dos are in progress, ”○ in progress” appears at the bottom right of the screen. Press it to open the list of in-progress to-dos, and choose one to jump to that row.
② All ToDos (dialog)
Section titled “② All ToDos (dialog)”Press ”➕” at the start of a row in “All ToDos” to add it to “ToDos.” The dialog stays open after each addition, so keep selecting ToDos. The “Hide added” switch at the right of the heading is on from the start. While it is on, goals already in your ToDos are hidden from the list, and only goals you haven’t added yet are shown (rows you add after opening the dialog stay until you close it, so you can keep selecting). When finished, close the dialog with ”×”, the Esc key, or a click outside the dialog, then check that the selected ToDos appear in the upper “ToDos” list.
Open the operation guide (icon meanings, click operations, and keyboard operations) from ”?” in the heading. Use Addness it on a row to hand it to AI, and the ”…” menu to add goals or access other actions.
Due dates are seen via the badge at the right end of each row. They show “Today,” “in ◯ days,” or ”◯ days overdue”; past-due ones are shown in red, and ones due within 3 days from today in orange. Press a badge to change the due date on the spot. Rows with no due date yet get no badge.
All ToDos
Set a due date from a row's "…" → "Set due date", and an "◯ days left" badge appears on the far right
Press Addness it to the right of the heading and choose “Organize goals”. The AI asks what you want to aim for and where you’re stuck now, then works with you from creating goals through to your ToDos. To find missing goals, choose “Gather information and add needed goals”. The AI gathers information and shows a list of missing goals. When the tree is empty, a large “Addness goal organization” button also appears at the bottom.
When you first start
Section titled “When you first start”When you finish signing up, a setup screen opens before Home. In 5 steps — “Connect” → “Personalize” → “Information sources” → “Set up environment” → “Delegate work” — you connect AI to Addness, AI builds your goal tree and ToDos, and you hand the first task over to AI. At the end, press “Start using Addness” to go to Home. For a detailed explanation of the steps, see Install an AI app and connect it to Addness.
On Home for people who signed up on the earlier screen, there may be a goal called Get started with Addness (previously “Set up Addness”), with goals for the setup steps under it. If you hand it to AI with “Work on it” from Addness it on the row, AI works through the steps in order and completes them.
Creating and advancing to-dos
Section titled “Creating and advancing to-dos”You can add goals to ToDos and work through to completion directly in the list.
- 1.See all ToDos
- 2.Use the blue + to add a goal to ToDos
- 3.Close
ToDos
Your list of things to work on now
Open the dialog with “See all ToDos” and use the blue dashed “+” at the start of a row to add it to ToDos. The dialog stays open after adding. When finished, close it with “×” to return to ToDos.
| Action | How |
|---|---|
| Add | Open the dialog with “See all ToDos” and use the blue dashed “+” at the start of a row to add it to ToDos. The dialog stays open after adding. When finished, close it with “×” to return to ToDos. On desktop, hover over a row in ToDos to reveal “−”. On mobile, use the row’s “…” → “Remove from ToDos”. The original goal remains. |
| Create new | While editing a title, press Enter and you can enter the next goal as if adding a line (pressing Enter when a row is only selected starts editing its title first) (a child goal also via the row’s ”…” → “Add a child goal”). To create from a template, use ”…” → “Add from template.” To put in a due date, use ”…” → “Set due date”. You can also enter a new goal by pressing “Add a ToDo” at the bottom of ToDos. |
| Start / complete | Click the status button at the start of a row (▶ not started → ✓ in progress → ✓✓ complete). An in-progress row also shows ⏸; press it and the row goes back to Not started |
| Edit | Click the to-do name to edit directly |
| Reorder / move | On desktop, drag a row. Drop it between rows to reorder it or move it under a different parent; drop it onto a row to make it that row’s child. On mobile, swipe a row right to move it one level down (child), or left to move it one level up. To move it under a different parent, use ”…” → “Change Parent Goal” |
You can keep up to 800 items in ToDos. You can remove ToDos you won’t work on now with “−”.
ToDos
Click the status button at the start of a row to advance it: in progress (✓) → done (✓✓)
What happens when the date changes?
Section titled “What happens when the date changes?”ToDos you add stay when the date changes. Each day starts at 4 a.m. in your organization’s time zone (Japan time in Japan). Work after midnight still counts as the same day until 4 a.m. After 4 a.m.:
- Completed ToDos (✓✓): Remain visible on the day of completion and stop appearing the next day
- Unfinished ToDos: Stay in the list. Let’s remove ToDos you won’t work on now with “−” on the row. The goals remain in “All ToDos” even after removal
- Goals added from routines: When the set rhythm comes, a full template set is newly added (daily reports, regular meetings, etc.). Unfinished ToDos from the previous run also stay until completed or removed.
Decomposing into actionable to-dos
Section titled “Decomposing into actionable to-dos”To split a goal into child goals, use one of the following.
- The row’s “…” → “Add a child goal”: Creates a child goal under that goal
- Keep typing with Enter: While editing a title, press Enter to enter the next goal. On desktop, drag a row onto another row to make it that row’s child. On mobile, swipe a row to the right to move it one level down
- “…” → “Add from template”: Adds child goals all at once from a template
For the child goals you split out, set the owner with “…” → “Assignee & members” and the due date with “…” → “Set due date.” For what you’ll do now, put it into your ToDos with the “+” at the start of the row. Write the state the goal should be in once it’s achieved in the goal’s “Ideal” (→ Goal detail page).
Decomposing together with AI
Section titled “Decomposing together with AI”- Brainstorm: A goal row’s Addness it → “Brainstorm.” The AI lays out the ideal and the current gap, organizes things while asking you questions, and shows a list of proposed child goals (with the ideal). Only the ones you OK are created
- Work on it: With Addness it → “Work on it,” the AI goes ahead as-is, creating the child goals it needs
How to read a row (the meaning of icons and displays)
Section titled “How to read a row (the meaning of icons and displays)”The icons on a goal’s row each have a set meaning and operation. Check the actual look.
Example of an actual row (on desktop, icons such as Addness it, memo, and "…" line up on the right of the row)
Status button
Each click advances it: ▶ Not started → ✓ In progress → ✓✓ Done. It turns green when completed
Add to ToDos
Adds this goal to ToDos. To remove it, press the − button on the right of the row in ToDos
Number of child goals
The number of child goals beneath it. Click to expand or collapse the sub-goals
Parent goal context
The light gray circle is the parent goal's row. It shows which goal this leaf goal belongs under
Addness it
Hands this goal to AI. Hover to show "Work on it" and "Brainstorm" (desktop only; on mobile, use "…")
Due date
The number of days left until the due date. Click to change the due date. Past-due goals are shown in red, and goals due within 3 days from today in orange
Memo
Opens that goal's memo
Actions menu
Do nearly everything to that goal—edit, add child goals, due date, KPI, delete, and more (all items are explained in the table below)
View details
Opens the goal detail page
On a goal the AI is working on, the icon of the member doing the work and the AI’s mark (Claude Code, Codex, etc.) appear to the left of the row’s Addness it. The dot’s color is green for running, yellow for waiting for confirmation (reply and it continues), and gray for no response (no report for 2 hours or more). Press the mark to open the AI’s conversation or jump to the comment with the AI’s question. You can clear your own AI’s display with “Hide” (it shows again the next time the AI reports). On PC, your own AI shows the dot with “AI running”, “AI waiting for review”, or “AI unresponsive” instead of the mark.
Each goal row’s ”…” menu
Section titled “Each goal row’s ”…” menu”From the ”…” (three-dot) on the right of a goal’s row, you can do almost every operation on that goal (desktop order).
| Menu item | What it does |
|---|---|
| Edit | Edit the goal’s title in place |
| Add a child goal | Add a child goal (sub-goal) under this goal |
| Add from template | Add goals under this goal all at once from a template |
| Meeting | Start a meeting with this goal as the topic. You can also copy the join link from the ”▸” on the right |
| Assignee & members | Change the owner or assign members |
| Set due date | Open the due-date calendar and set/change the due date |
| Set up KPI | Tie a number (KPI) to this goal |
| Comment | Open this goal’s comment panel |
| Notifications | Check notifications about this goal |
| More actions | Change Parent Goal, Copy link, Activity Log, Work on this goal with someone outside the org (Beta), Save as template |
| Delete goal | Delete the goal |
| Hidden features (number) | The features you haven’t opened yet (Meeting, KPI, and so on) are gathered here |
In the row’s ”…” menu, choose “Work on it” or “Brainstorm” under “Addness this goal” to hand the goal to AI. (→ Addness it)
In a newly created organization, items such as “Add from template,” “Meeting,” “Assignee & members,” “Set up KPI,” “Comment,” and “Notifications” may be locked and gathered together under the last item, “Hidden features (number).” When you finish the challenges, they appear in their usual places (→ Challenges and feature locks).
On desktop, the goal detail page opens from the icon at the right end of the row (“View goal details”). Press the memo icon to open that goal’s details (the ideal, resources, memo, etc.) without leaving the screen.
On mobile, pressing ”…” opens an actions screen that gathers changing the assignee and due date, adding to and removing from ToDos, comments and notifications, “More actions,” and more. Open the goal detail page from “Goal page” there.
Addness it
Section titled “Addness it”Addness it on the right of a goal’s row is the entry point for handing work to AI. Hover over it or click it, and three options appear: “Work on it,” “Brainstorm,” and “Ask.”
- Work on it: The AI moves that goal forward. It decides what to do next from the gap between the ideal and the current state, splits the work into child goals when it’s large, and completes the goal once it reaches the ideal
- Brainstorm: The AI organizes things while talking with you. It asks you about the issues and options, shows a list of the child goals it proposes (with the ideal), and creates only the ones you OK.
- Ask: A small window opens; write what you want to ask about this goal and press “Choose where to send.” The AI only reads the goal and answers; it doesn’t change the goal’s status, body, comments, or child goals. Handing it over doesn’t put the goal in progress either
When you choose “Work on it” or “Brainstorm,” the destinations “Copy instruction,” “Open in Claude,” “Open in Codex,” “Open in ChatGPT,” and “Open in Grok Bot” appear.
- Open in Claude / Open in Codex: That AI’s app opens with the instruction already filled in (assuming you have the app installed). If you press it in a browser and the app doesn’t open, ”◯◯ didn’t open” appears; install the app, or paste the instruction into the AI with the “Copy instruction” that appears
- Open in ChatGPT: ChatGPT opens in another tab with the instruction already filled in. The instruction is also copied, so if earlier text remains in ChatGPT’s input field, delete it and paste (assuming you’ve added the Addness plugin to ChatGPT. → MCP integration)
- Open in Grok Bot: Prompt copied too. If Grok Bot still shows an old draft, clear it and paste. The prompt is too long for the link, so Grok Bot was opened. The prompt is copied, so paste it into the composer and send.
- Copy instruction: Paste it into another AI like Cursor and use it
To make it one click instead of choosing every time: From “Set a handoff and make it one click” at the bottom of the menu, you can choose the “Instruction handoff” under “AI” in Personal settings (Choose each time / Open in Claude / Open in Codex / Open in ChatGPT / Open in Grok Bot / Copy instruction). Once it’s set, just pressing “Work on it” or “Brainstorm” opens that AI. The bottom of the menu shows the current setting, like “Handoff: Claude” with “Change” next to it.
You can also hand work to AI using “Addness it” on the row. In the row’s ”…” menu, choose “Work on it” or “Brainstorm” under “Addness this goal” to hand the goal to AI.
The instruction includes the goal’s URL and how to proceed. The AI reads the goal’s context via MCP (ideal, memo, parent and children, comments, AI memory) and decides what to do next from the gap between the ideal and the current state. It proceeds while creating child goals if needed, and writes what it learns into the goal’s memo. The AI asks you its questions in the conversation with the AI, and checks with other members by mentioning them in an Addness comment. The AI reports start, waiting-for-check, and finish to the goal, so the mark on the row tells you how things stand (→ How to read a row).
Use “Addness the ToDo to work on now” at the right of the ToDos heading to organize your goal tree and have AI decide which ToDos to work on now.
When the AI stops and asks you to check something
Section titled “When the AI stops and asks you to check something”When you ask with “Work on it,” the AI works toward the goal’s ideal, researching and doing the work on its own. If the goal is large, it splits it into child goals and keeps going until it reaches the ideal, completing each child goal as it finishes. It writes what it learns and decides into the goal’s body as it goes.
Even so, the AI stops and comes back to you in the following cases. When the AI reports that it’s waiting for a check, the dot on the row’s AI mark turns yellow.
- Operations that need permission: permission prompts from the AI app (changing files, running commands, etc.), sending emails or messages, and deleting data
- Choices for you to make: things only you can decide, such as when the ideal is still vague or when choosing between possible approaches
- Things for you to check: when it wants you to look at what it made or at intermediate results
Work that only a person can do — such as logging in, identity verification, or approvals — also comes back to you. The AI may leave such work as a child goal with the steps written down.
To have it continue, do one of the following.
- Answer in the same conversation: Answer the AI’s question, or send “continue.” To return to the conversation, press the AI mark on the row and choose “Open in Claude” or “Open in Codex” (if it doesn’t appear, open the conversation inside the AI app)
- Press “Work on it” again: If you closed the conversation, press the row’s Addness it → “Work on it” again. The instruction is the same as the first time. The AI rereads the goal’s body, child goals, comments, and AI memory, and continues the remaining work from the gap between the ideal and the current state
If the goal’s ideal is empty or vague, the AI aligns with you on it before starting the work.
For recurring work, use routines
Section titled “For recurring work, use routines”Work that repeats daily or weekly (morning meetings, daily reports, weekly regulars, etc.) can be added automatically with the “Routines” on the templates page.
Choose a template and decide where, on what rhythm, and under whose ownership to add it. When the set day comes, the full template set is added to the tree automatically.
- The entry point is the templates page’s “Routines” tab → “Create routine.” You can also create one from “Add periodically” on a template card or from the “Routines” field on the goal detail page. The ToDos heading’s ”…” → “Set up routines” opens the Routines tab
- The rhythm is daily, weekly (by weekday), or monthly (by date; month-end is possible too)
- An added goal gets a “From the routine of ◯◯” chip, and you can check the template name, rhythm, next run date, and assignee
The detailed how-to and operation (pause, resume, delete, notifications on failure) are collected on the Templates page.
In a newly created organization, routines may be locked. Finish the challenge “Get to know Routines” to use them (→ Challenges and feature locks).
For longtime users: The recurring goals you set on goals have migrated to routines. Migrated settings can be checked and edited on the templates page’s “Routines” tab.
Other handy features
Section titled “Other handy features”Widgets
Section titled “Widgets”At the top right of the widget area, the “Add” and “Edit widgets” buttons appear. From “Add”, you can place ready-made widgets. To rearrange or remove them, use “Edit widgets”. On narrow screens such as phones, only “Add” appears.
- Execution: Today’s progress, a streak calendar, goals waiting on someone, and AI at work (goals your AI is working on right now, and their status)
- Goals: Goals with approaching deadlines, goals in progress, and goals finished this week
- Schedule: Today’s schedule, this week’s schedule, and the next meeting
- Numbers: KPI
- Team: Pulse (shows, across your organization and all of Addness, who has just completed a ToDo or achieved a goal), the team’s today, unread mentions, received requests, and notifications
- Me: Memo, focus timer, and today’s reflection
Widgets tied to features you haven’t opened yet don’t appear in the list. The feature for building your own widgets with AI is in development and can’t be used yet. Custom widgets already placed show “Custom widgets are in development.”
In a newly created organization, widgets may be locked. Finish the challenge “Add a widget to Home” to use them (→ Challenges and feature locks).
You can rename a widget by choosing ”…” → “Rename” in its heading, or by double-clicking the heading. You can rename the “ToDos” heading the same way. A name can have up to 64 characters. Press Enter to save and Esc to cancel. If you save the “ToDos” name empty, or enter the original heading name and save, it returns to the original heading. Guests do not see “Rename”.
Google Calendar integration
Section titled “Google Calendar integration”From the ToDos heading’s ”…”, turn on the “Google Calendar integration” switch and grant permission with your Google account, and today’s events line up in “Today’s schedule” on Home. If you haven’t connected yet, a “Connect Google Calendar” button appears at the right of the heading row (next to ”…”). You can also connect from this button (on narrow screens only the icon appears).
- Events can also be set to in progress or complete with the button at the start of the row, just like to-dos
- To read the calendar of a Google account other than the one you log in with, add that account from “Connect Google account” in My Settings › Integrations (an added account is labeled “Calendar only”). Choose the account to read events from in “Account to read” and the calendars to read in “Calendars to read”
- When events don’t appear: What’s read is the primary calendar of the Google account chosen in “Account to read.” Events from other calendars, such as shared calendars, appear when you choose them in “Calendars to read” under My Settings › Integrations. To read your company’s Google Calendar, have the company calendar shared with your connected Google account with “See all event details,” then choose it in “Calendars to read”
- The previous integration via iCal / ICS URL will end soon. If you registered one, turn on the same switch to move to the new integration
Streak (consecutive-achievement days)
Section titled “Streak (consecutive-achievement days)”The flame counter 🔥 at the top right of the screen is your streak. Complete even one to-do that day and the consecutive-day count grows. Click to open the details, and the longer you keep going, the more a “Top ◯% in the world!” display appears too. It shows your position among Addness users worldwide.
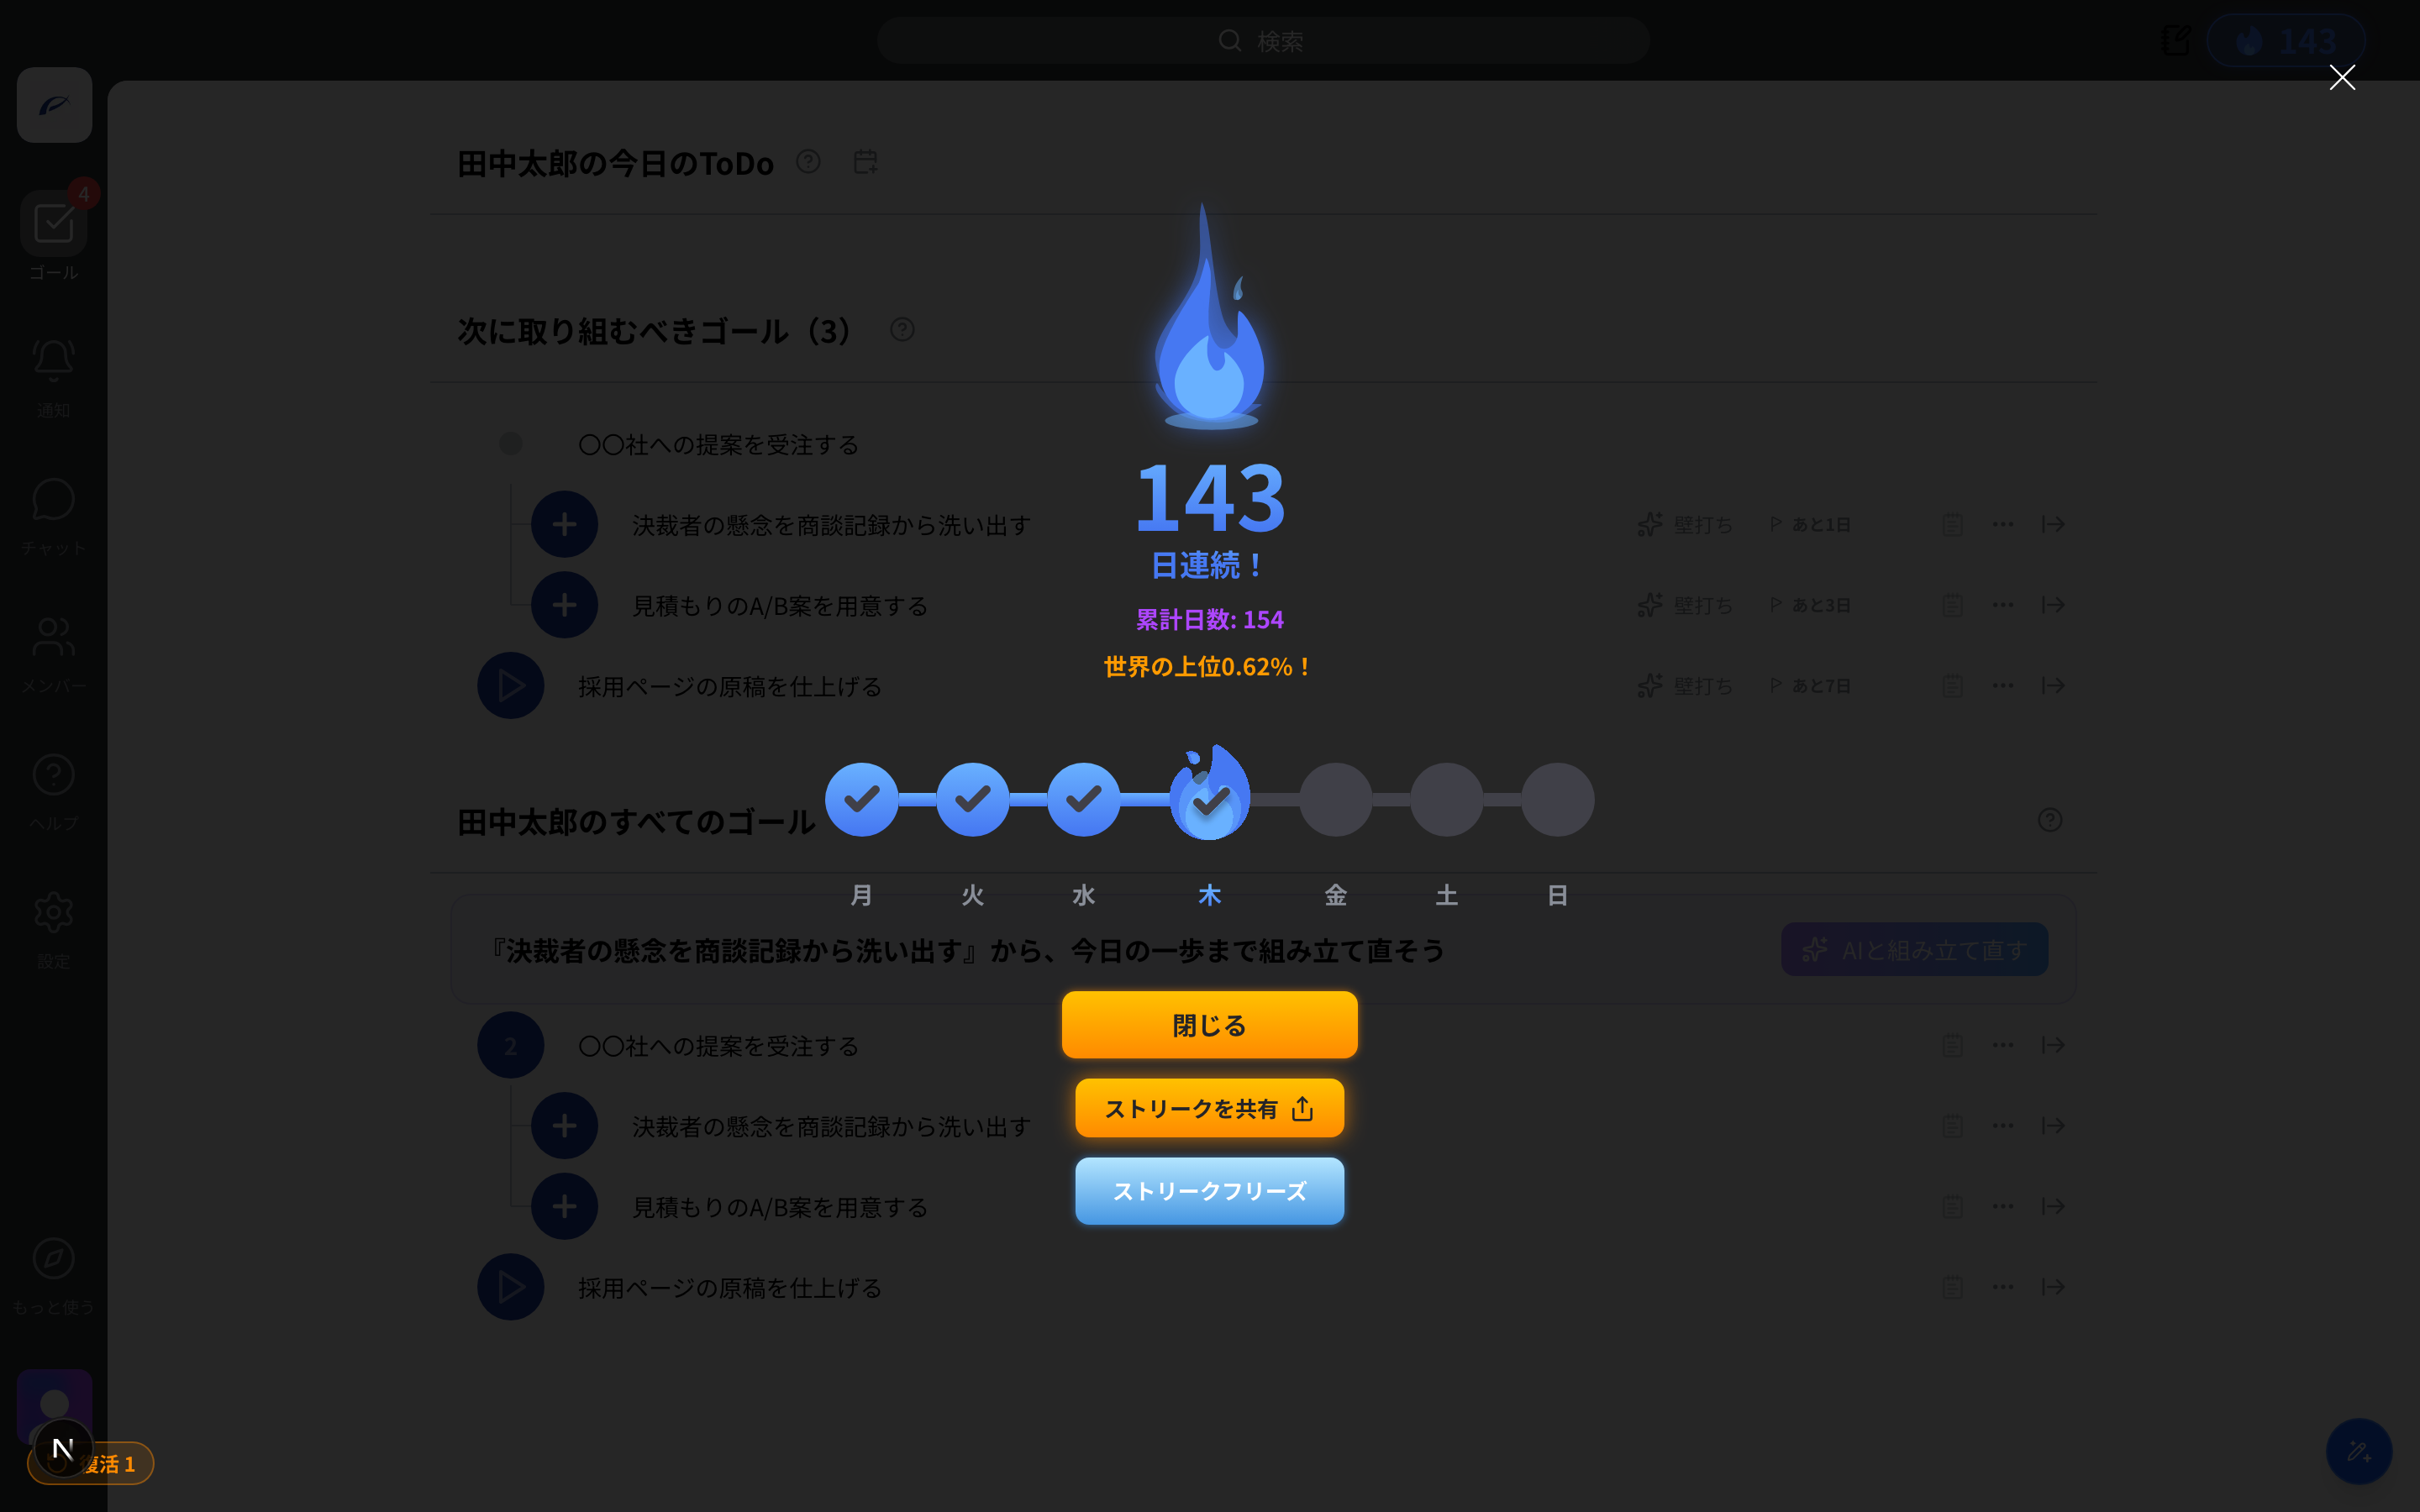
The streak has the following features.
- Streak freeze: Days you decide “I won’t do it today,” like days off, can be excluded from the count. The streak is kept even without achieving a goal (the target is that day’s 4 a.m. to the next 4 a.m.)
- Streak revival: Even if it breaks, there’s a revival chance once a month. You can cancel yesterday’s non-achievement and continue the streak
- Share your streak: Create a share link and show your consecutive record on social media or to peers
When your streak extends for the first time that day, you also get the usage-points daily bonus (→ Proficiency level and points).
Was this article helpful?
Thanks for your feedback!
We'd love to improve it — tell us what was missing.
Send feedback